
Monday 30 September 2013

How to clean and take care of your camera and lens
Specks / dust on the pictures taken with the camera
The most common problem faced by users of digital cameras, is the presence of dust on the camera's sensor. It can have a negative effect on the images, as in the areas of light-colored pictures can be seen blurry, dark spots. In most cases, they are visible to the camera toward a cloudless sky, as in the following example.

Sometimes erroneously concluded that appearing in photographs spots are caused by dust on translucent mirror, the electronic viewfinder or the lens . Dust on the semi-transparent mirror or in the electronic viewfinder has no impact on the final appearance of the photograph. Ordinary dust particles contained in the lens are very small and are located far away from the focal point , so they are not visible in the pictures.What precautions can be taken in order to prevent stagnation of dust on the sensor , or translucent mirror?You can not completely prevent the ingress of dust into the camera . However, you can use a number of practical tips , allowing significantly reduce the risk.
Before replacing the lens off the camera . This can reduce the static electric charge on the matrix and reduce the risk of attracting dust particles .
Before mounting the lens on the camera , make sure that the outer surface of the rear of the lens is clean and free of dust. To remove dust and other particles that can scratch the glass surfaces , use a blower to clean the device types Rocket . Then, if necessary, use a dry cloth made of microfiber.
Do not leave the camera with the lens mount open for a long time . When replacing the lens to attach the cover to the camera body or immediately install another lens .
If possible, replace the lens in a dry place with a small amount of dust or sand.
When changing lenses, the lens mount face down to prevent the ingress of dust particles into the camera.
Rear lens cover camera body and must be kept clean and free of dust . After mounting the lens on the camera rear lens cap can be connected to the camera body. This will prevent the accumulation of dust and dirt on the elements , especially in the case of storage lids photographer's camera bag .

Bag should be kept clean . After some time using the camera bag inside it to assemble a surprisingly large amount of dust and debris. Completely empty the bag and remove all the dust and dirt with a vacuum cleaner. Before using the vacuum cleaner bags , remove all small items such as memory cards , secure the cover on a sled , etc.What to do in case of dust particles in the pictures ?SLT cameras are equipped with a two-point function to prevent the settling of dust.
Anti-static coating optical low-pass filter
The vibration sensor is aimed at the removal of light particles of dust , which loosely adhere to the low-pass filter . SLT cameras launched in the summer of 2011 ( SLT- A77 and higher) are equipped with more efficient - compared with the previous models - the ultrasonic vibration system for removing dust particles .The matrix is automatically set into oscillation at every turn the camera off . This function can also be included in the menu , if necessary . Due to the automatic triggering of the anti -dust each time the camera off the dust that was visible in the pictures taken so far are likely to be removed . In addition, most of the dust particles are very small in size and can not be seen by looking at the matrix to the naked eye .Manual cleaning camera sensor ( placed in front of her and an optical low-pass filter )Sony has approved only one cleaning method that can carry users : manual cleaning with a rubber blower to clean the camera ( a Rocket blower ) * . Using other methods can lead to damage to the matrix , and placed it in front of the optical low-pass filter and void the warranty on the camera .To clean the optical low-pass filter placed in front of the matrix , perform the following steps:
Turn the camera off to start the automatic vibration sensor to remove loose dust obscures the lamp .
Remove the lens . Once this is done can be seen translucent mirror placed in front of the matrix . Using a rubber blower to clean the camera gently blow away the dust that had settled on a semi-transparent mirror. Be careful not to touch the mirror.
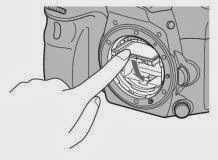
To access the template , you should raise the mirror . To raise the mirror , gently press the lever to lock the mirror with your fingertips .

Do not touch the surface of the translucent mirror! Mirror of this camera model is made of translucent film. Touching the mirror may cause deformation or deposition of dust on it, which may affect the quality of the images and the camera.

Position the camera so that the lens mount is facing down, and insert the shallow end of the syringe into the camera and repeatedly enter the air stream. This usually results in a matrix of conventional cleaning dust particles and remove them from the camera.
Once this is done, gently adjust the mirror to its original position with the fingertip, until you hear a click. This time, also touch the mirror housing rather than its surface.
* Manual cleaning rubber bellows camera / bellows type Rocket: Many manufacturers offers a hand blower to clean the camera in a very different rates and different quality. Rubber blower good quality are equipped with replaceable air filters to prevent blow-dust particles inside the camera. Rubber bellows camera cleaning is an essential part of any photographer's equipment and its use can get visible results immediately.
Note: Do not clean the sensor using a can of compressed air! Air pressure may be too high and cause damage to the camera. Moreover, there is the risk of deposition of small droplets of aggressive liquids on the filter or semi-transparent mirror, which can lead to serious damage.
Dust on the semi-transparent mirror
Translucent mirror is a very sensitive part of the camera.
Mirror of this camera model is made of translucent film. Touching the mirror may cause deformation or deposition of dust on it, which may affect the quality of the images and the camera. The semi-transparent film is also very susceptible to scratching.

Under no circumstances should you wipe dirt, dust or greasy dirt from the mirror SLT . Also, do not use any cleaning fluids . This may damage the translucent mirror. Damage caused as a result of direct contact with a translucent film are not covered by the warranty.In order to keep the mirror SLT clean and the camera itself in the best possible condition periodically use a rubber blower to clean the camera * to prevent the accumulation of dust. Before attaching the lens should also clean the outer surface of the rear lens. This is especially important if you use this camera in places subject to high humidity or wherever there is a risk of condensation . In conditions where there is moisture or there is a condensation residual dust on the mirror SLT can permanently adhere to the mirror.* Manual cleaning rubber bellows camera / bellows type Rocket : Many manufacturers offers a hand blower to clean the camera in a very different rates and different quality . Rubber blower good quality are equipped with replaceable air filters to prevent blow- dust particles inside the camera. Rubber bellows camera cleaning is an essential part of any photographer's equipment and its use can get visible results immediately .Note : Do not use a can of compressed air ! Air pressure may be too high and cause damage to the camera. Moreover, there is the risk of deposition of small droplets of liquid aggressive translucent mirror , which can lead to serious damage .Dust inside the lens


If you reside in an area with high humidity, or moving from a cold to a warm location, you may receive steam. Condensation can lead to oxidation of certain metal parts inside the camera , causing a malfunction. It can also lead to the development of mold and mildew , which will cause damage to the equipment . To reduce the risk , it is recommended to store in a case sachets of silica gel. Silica gel allows absorption of moisture.When you use the equipment may lead to deposition of dust and other solid particles on the camera body and lens , there may be also fingerprints. The following is a way to remove them without damage to the equipment.
camera Body
For example, after a day at the beach in the recesses of the camera body may appear grains of sand . If they are not removed quickly , can get into the control discs , causing premature wear , which makes the camera will not be fit for use . Grains of sand can also cause serious damage to the lens ring .
The easiest way to remove debris , clean the exterior of the camera with a soft bristle brush . Do not press too hard , as this can scratch the body or the LCD screen.
If sticky dust can not be removed with a brush , you can do this, use a cotton ball . The blowing wand is best to use a rubber bulb .
However, if the camera body is clean hard-to- remove substances ( mud , etc.) , you can successfully use a micro fiber cloth (available in optics ) lightly moistened with water. Microfibers are recommended because they do not scratch the LCD screen.
Do not use any chemical products such as thinner, benzine , alcohol , disposable wipes , etc.
Lenses
The lenses should be handled with caution . Glass , which are made of lenses , it is very delicate and can easily be scratched. Lenses should be cleaned only in exceptional circumstances. Each cleaning affect the optical surface . Always leaves traces , even if they are not immediately visible to the naked eye . Slightly dusty lens is better than a scratched lens .
According to the manufacturer's cleaning is necessary if you notice signs of the fingers are naturally oily and are acidic and can damage the anti-reflective lens coating . Remove dried rain drops and droplets of sea water , because they contain salt crystals , which can also damage the glass .Remove dust and microscopic particlesFirst, use a rubber blower to clean the camera to blow out most of the dust. Do not blow into the mouth. This can lead to deposit on the lens difficult to remove particles of saliva.Then, using a soft bristle brush , remove dust from the lens. Do not touch the hair brush with your fingers , as this will cause the smears and smudges will result . Do not press too hard. After a day at the beach on the glass of the lens can embed the microscopic particles of quartz or silica , and inadequate cleaning method could lead to scratch the optical surface .Removing oily smudges and fingerprintsThe general rule is : do not touch the glass with your fingers. If the glass there are fingerprints , should never be disposed of by clothing or hygiene wipes . The fibers from which they are made, are too rough and can scratch the glass .Use a microfiber cloth , which must be kept in a bag or carrying case to protect it in this way against dust.If you need to use liquid to remove oil smudges , do not use this to tap water because it contains salts can scratch the glass .Instead of tap water to moisten the cloth with microfibers in deionized water and gently , without pushing , wipe the surface of the glass.
The most common problem faced by users of digital cameras, is the presence of dust on the camera's sensor. It can have a negative effect on the images, as in the areas of light-colored pictures can be seen blurry, dark spots. In most cases, they are visible to the camera toward a cloudless sky, as in the following example.
Sometimes erroneously concluded that appearing in photographs spots are caused by dust on translucent mirror, the electronic viewfinder or the lens . Dust on the semi-transparent mirror or in the electronic viewfinder has no impact on the final appearance of the photograph. Ordinary dust particles contained in the lens are very small and are located far away from the focal point , so they are not visible in the pictures.What precautions can be taken in order to prevent stagnation of dust on the sensor , or translucent mirror?You can not completely prevent the ingress of dust into the camera . However, you can use a number of practical tips , allowing significantly reduce the risk.
Before replacing the lens off the camera . This can reduce the static electric charge on the matrix and reduce the risk of attracting dust particles .
Before mounting the lens on the camera , make sure that the outer surface of the rear of the lens is clean and free of dust. To remove dust and other particles that can scratch the glass surfaces , use a blower to clean the device types Rocket . Then, if necessary, use a dry cloth made of microfiber.
Do not leave the camera with the lens mount open for a long time . When replacing the lens to attach the cover to the camera body or immediately install another lens .
If possible, replace the lens in a dry place with a small amount of dust or sand.
When changing lenses, the lens mount face down to prevent the ingress of dust particles into the camera.
Rear lens cover camera body and must be kept clean and free of dust . After mounting the lens on the camera rear lens cap can be connected to the camera body. This will prevent the accumulation of dust and dirt on the elements , especially in the case of storage lids photographer's camera bag .
Bag should be kept clean . After some time using the camera bag inside it to assemble a surprisingly large amount of dust and debris. Completely empty the bag and remove all the dust and dirt with a vacuum cleaner. Before using the vacuum cleaner bags , remove all small items such as memory cards , secure the cover on a sled , etc.What to do in case of dust particles in the pictures ?SLT cameras are equipped with a two-point function to prevent the settling of dust.
Anti-static coating optical low-pass filter
The vibration sensor is aimed at the removal of light particles of dust , which loosely adhere to the low-pass filter . SLT cameras launched in the summer of 2011 ( SLT- A77 and higher) are equipped with more efficient - compared with the previous models - the ultrasonic vibration system for removing dust particles .The matrix is automatically set into oscillation at every turn the camera off . This function can also be included in the menu , if necessary . Due to the automatic triggering of the anti -dust each time the camera off the dust that was visible in the pictures taken so far are likely to be removed . In addition, most of the dust particles are very small in size and can not be seen by looking at the matrix to the naked eye .Manual cleaning camera sensor ( placed in front of her and an optical low-pass filter )Sony has approved only one cleaning method that can carry users : manual cleaning with a rubber blower to clean the camera ( a Rocket blower ) * . Using other methods can lead to damage to the matrix , and placed it in front of the optical low-pass filter and void the warranty on the camera .To clean the optical low-pass filter placed in front of the matrix , perform the following steps:
Turn the camera off to start the automatic vibration sensor to remove loose dust obscures the lamp .
Remove the lens . Once this is done can be seen translucent mirror placed in front of the matrix . Using a rubber blower to clean the camera gently blow away the dust that had settled on a semi-transparent mirror. Be careful not to touch the mirror.
To access the template , you should raise the mirror . To raise the mirror , gently press the lever to lock the mirror with your fingertips .
Do not touch the surface of the translucent mirror! Mirror of this camera model is made of translucent film. Touching the mirror may cause deformation or deposition of dust on it, which may affect the quality of the images and the camera.
Position the camera so that the lens mount is facing down, and insert the shallow end of the syringe into the camera and repeatedly enter the air stream. This usually results in a matrix of conventional cleaning dust particles and remove them from the camera.
Once this is done, gently adjust the mirror to its original position with the fingertip, until you hear a click. This time, also touch the mirror housing rather than its surface.
* Manual cleaning rubber bellows camera / bellows type Rocket: Many manufacturers offers a hand blower to clean the camera in a very different rates and different quality. Rubber blower good quality are equipped with replaceable air filters to prevent blow-dust particles inside the camera. Rubber bellows camera cleaning is an essential part of any photographer's equipment and its use can get visible results immediately.
Note: Do not clean the sensor using a can of compressed air! Air pressure may be too high and cause damage to the camera. Moreover, there is the risk of deposition of small droplets of aggressive liquids on the filter or semi-transparent mirror, which can lead to serious damage.
Dust on the semi-transparent mirror
Translucent mirror is a very sensitive part of the camera.
Mirror of this camera model is made of translucent film. Touching the mirror may cause deformation or deposition of dust on it, which may affect the quality of the images and the camera. The semi-transparent film is also very susceptible to scratching.
Under no circumstances should you wipe dirt, dust or greasy dirt from the mirror SLT . Also, do not use any cleaning fluids . This may damage the translucent mirror. Damage caused as a result of direct contact with a translucent film are not covered by the warranty.In order to keep the mirror SLT clean and the camera itself in the best possible condition periodically use a rubber blower to clean the camera * to prevent the accumulation of dust. Before attaching the lens should also clean the outer surface of the rear lens. This is especially important if you use this camera in places subject to high humidity or wherever there is a risk of condensation . In conditions where there is moisture or there is a condensation residual dust on the mirror SLT can permanently adhere to the mirror.* Manual cleaning rubber bellows camera / bellows type Rocket : Many manufacturers offers a hand blower to clean the camera in a very different rates and different quality . Rubber blower good quality are equipped with replaceable air filters to prevent blow- dust particles inside the camera. Rubber bellows camera cleaning is an essential part of any photographer's equipment and its use can get visible results immediately .Note : Do not use a can of compressed air ! Air pressure may be too high and cause damage to the camera. Moreover, there is the risk of deposition of small droplets of liquid aggressive translucent mirror , which can lead to serious damage .Dust inside the lens
If you reside in an area with high humidity, or moving from a cold to a warm location, you may receive steam. Condensation can lead to oxidation of certain metal parts inside the camera , causing a malfunction. It can also lead to the development of mold and mildew , which will cause damage to the equipment . To reduce the risk , it is recommended to store in a case sachets of silica gel. Silica gel allows absorption of moisture.When you use the equipment may lead to deposition of dust and other solid particles on the camera body and lens , there may be also fingerprints. The following is a way to remove them without damage to the equipment.
camera Body
For example, after a day at the beach in the recesses of the camera body may appear grains of sand . If they are not removed quickly , can get into the control discs , causing premature wear , which makes the camera will not be fit for use . Grains of sand can also cause serious damage to the lens ring .
The easiest way to remove debris , clean the exterior of the camera with a soft bristle brush . Do not press too hard , as this can scratch the body or the LCD screen.
If sticky dust can not be removed with a brush , you can do this, use a cotton ball . The blowing wand is best to use a rubber bulb .
However, if the camera body is clean hard-to- remove substances ( mud , etc.) , you can successfully use a micro fiber cloth (available in optics ) lightly moistened with water. Microfibers are recommended because they do not scratch the LCD screen.
Do not use any chemical products such as thinner, benzine , alcohol , disposable wipes , etc.
Lenses
The lenses should be handled with caution . Glass , which are made of lenses , it is very delicate and can easily be scratched. Lenses should be cleaned only in exceptional circumstances. Each cleaning affect the optical surface . Always leaves traces , even if they are not immediately visible to the naked eye . Slightly dusty lens is better than a scratched lens .
According to the manufacturer's cleaning is necessary if you notice signs of the fingers are naturally oily and are acidic and can damage the anti-reflective lens coating . Remove dried rain drops and droplets of sea water , because they contain salt crystals , which can also damage the glass .Remove dust and microscopic particlesFirst, use a rubber blower to clean the camera to blow out most of the dust. Do not blow into the mouth. This can lead to deposit on the lens difficult to remove particles of saliva.Then, using a soft bristle brush , remove dust from the lens. Do not touch the hair brush with your fingers , as this will cause the smears and smudges will result . Do not press too hard. After a day at the beach on the glass of the lens can embed the microscopic particles of quartz or silica , and inadequate cleaning method could lead to scratch the optical surface .Removing oily smudges and fingerprintsThe general rule is : do not touch the glass with your fingers. If the glass there are fingerprints , should never be disposed of by clothing or hygiene wipes . The fibers from which they are made, are too rough and can scratch the glass .Use a microfiber cloth , which must be kept in a bag or carrying case to protect it in this way against dust.If you need to use liquid to remove oil smudges , do not use this to tap water because it contains salts can scratch the glass .Instead of tap water to moisten the cloth with microfibers in deionized water and gently , without pushing , wipe the surface of the glass.
Sunday 29 September 2013


Saturday 28 September 2013

How to Clean Your Digital Camera Sensor
Anyone cyfraka discovered after some time on your photos spots that should not be on them. As it often turns out that the cause of pollution is the contamination of photos the camera sensor. Therefore, sooner or later you will need to clean the matrix, which in many cases you can make yourself.
Contrary to popular belief , the sensor cleaning is too complicated task , so there is no reason to fear it , but certainly you have to be careful. If you only have access to the camera , this operation is relatively simple . Therefore SLR owners are in a better position because , without unscrewing cyfraka have direct access to the matrix - it is enough to remove the lens and turn the key. So they can no contraindications to clean it yourself - for such a service in the service have to pay dearly . The worse situation , unfortunately, compact users who have to do so they would have spread to the camera . Therefore fotoamatorom uses cyfraków with non-replaceable optics discourage self- dusting matrix , as this may void your warranty and damage to the compact . The method described below is addressed solely to the owners of digital SLR cameras .Before we begin ...The first thing we need to do before you start cleaning the sensor to charge the battery. During the cleaning process must be because cyfrak on ( Sensor Cleaning mode ) and it continuously raised mirror and open the shutter curtain . If you vacuum sensor we unloaded the battery , it uszkodzilibyśmy mirror or snapshot . Therefore, let us work only with fully charged batteries ! Not recommended for use as a power source is connected to the AC outlet , as the decrease or loss of power would result in the same effect as the discharge of the battery - unless you 're protected uninterruptible power supply (UPS).
Before removing the lens should also wipe the device with a cloth (preferably soaked in anti-static ) . This allows the interior cyfraka us not fall further dust present on the body , and the body will not be electrified and attracted " fresh " dust. After optics - before you enable the option Sensor Cleaning - should also vacuum the inside of the camera.
Then it is good to see where the matrix is dirt . To this end, we should take a picture before the bright and uniformly illuminated flat surface with the camera set to the smallest aperture , which is the largest of its value , such as f/22, f/32 . A good subject for this photo is a white wall or the sky - in the latter case, attention is drawn to the frame did not show up any bird that could be later interpreted as a speck . Such approach taken notice any dirt sensor . Particles of dust, sand and Italian come to photography as a fine dark spot with sharp edges , and greasy dirt - as translucent spots with gentle range. Just remember that the captured image is reversed with respect to that which occurs in the matrix - for example, point to the upper left of the frame is located in the lower right corner of the sensor.

Before we start cleaning the sensor, it is worth doing a test shot to get an idea of where the contamination. The photograph is performed on the highest available aperture and a theme images can be selected such as the sky .After the initial set up your unscrew the lens and turn the Sensor Cleaning function - now we have full access to the camera and the matrix, or rather it is located above the filter antyaliasingowego (his will in fact be cleaned ) . Although the lithium- niobium surface of the filter is fairly scratch resistant , it does not mean that it can not be damaged - and therefore the steps vacuum sensor must be done very gently and carefully !Dry or wet ?There are two methods for sensor cleaning : dry and wet. Using the first remove any volatiles from the sensor particles ( pollen, dust , sand , etc.) , and the second is used to dispose of oily stains. Notwithstanding this , the dirt removed , it is first necessary to collect the (dry) from the surface of the matrix particles of dust with a vacuum cleaner or a brush electrostatic pears to sharp particles , such as sand , not porysowały us sensor . The operation is performed by holding the camera lens mount down , bearing in mind that the vacuum inside the walls of the body - otherwise , found dust on them in a short time re- contaminate the matrix .
If the sensor have oily spots , then the next step we have to wash the "heart cyfraka " (so-called wet method ) using special swabs and fluid . Before cleaning , always performed first dry-cleaning ! Using for the first time with some liquid should test it before you use ( check that does not leave behind white streaks ) , performing a trial cleaning surfaces such as pocket mirrors . Only after this test we can proceed to remove stains from the matrix. Just remember that the liquid applied on a spatula ( not directly on the sensor ! ), Which is in a very delicate way to wipe the surface of the filter. After the cleaning is finished, turn off the camera , we run the lens i .. ready . Now you can re- take the photo and see if we removed all the dirt .
On the following pages you will find a list of accessories necessary to perform surgery to remove the contaminants from the matrix , and a summary of the tasks in four steps with helpful tips .
Corporate sensor cleaning accessories
Finished products from the list below can be purchased at specialty retail, or through online stores and auction sites.
Pear - works well to remove dust and dry. Is it worth it to buy at the pharmacy, because at photo shops is usually several times more expensive. When working with a blower be careful not to touch her die - rubber tracks are hard to remove. It is also better to suck dust than blow air inside pears because sometimes there is condensation, which while blowing can "spit" water droplets sensor.
Brush electricity - the best tool for vacuuming. It has soft bristles, so it will not scratch the sensor. Attracts dust and not lose hair, which is often the case when we use ordinary brush.

The vacuum sensor dry most of the electrostatic brush, for example, such as that of brushoff.
Special cleaning fluid matrix - often sold complete with spatulas, helps to remove grease and leaves a trace. Low-cost optics cleaning fluid should not be used for "cleaning" sensor, as they often leave white streaks on the matrix - like stale or low-level spirits. Do not pour liquid directly onto the sensor (it only wettable spatula)!

Before buying a fluid first let's check the expiration date, as expired or evaporated can leave white streaks on the sensor.
Spatulas - special sticks made of wood or plastic and fiber material niegubiącego. They are used solely in conjunction with the liquid to wet cleaning. Ordinary Ear swabs should not be used as they leave the matrix Italian and sharp tip swab could scratch the anti-aliasing filter.

The way home
Ready for sensor cleaning accessories are relatively expensive and sometimes impossible to find. Therefore, if we can not afford a complete set, you can do it yourself.
Vacuum cleaner - instead of pears or electrostatic brush to remove dust and sand from entering the camera can use household vacuum cleaner. However, to fulfill on their role, we have to adapt it accordingly. We will need to shrink tube (available at automotive stores) and the plug (eg rubber used to baniaków the wine) with the appropriate diameter to permit a vacuum cleaner hose end blindness. Then drilled a hole in the cap and plug in the heat-shrinkable tubing - well, if it has at least 40-50 inches long. Now we can collect any dust not only from the matrix, but also from the mirror and focusing screen. NOTE: Do not touch any parts inside the tube camera!
Alcohol - instead of expensive cleaning fluid to the matrix can be used much cheaper - and sometimes even more effective - pure isopropyl alcohol (isopropanol) or methyl (methanol) with a high concentration (98-99%). He does very well with all the oil stains. Put some it is always the spatula. NOTE: Do not use old, weathered and low-level alcohol because they will leave white streaks on the sensor!
Sensor cleaning step by stepBefore we proceed to vacuum matrix , we should first clear the body of dust that do not run on the vacuum sensor inside the camera. We also need to recharge the batteries , because cyfraka off during the cleaning process can damage the shutter and mirror. It is also done - with a stop set to the highest value (eg, f/22, f/32 ) - a test shot uniform surface (eg a white sheet of paper or the sky ) , which will locate the dirt on the sensor . We should remember that the image displayed on the LCD display is reversed - it's what the matrix is in the upper left corner of the screen will appear in the lower right corner . Now we can get down to work ...Step 1Unscrew the lens from the body and using pears or properly equipped, remove the vacuum cleaner ( not touching any part of cyfraka ! ) Particles of dust or sand inside the camera . Then turn on the option menu of our cyfraka Sensor Cleaning - now have full access to the heart of SLR . Throughout the duration of the sensor cleaning function will be maintained raised mirror , which is why it is important for you to keep control of the battery charge .Step 2Use the brush to gently remove the electrostatic dry matrix particles such as dust , sand , etc. For this purpose, we can use a vacuum cleaner or a pear ( it is better to suck than blow it ) - do not touch them, but the surface of the filter , because it could scratch . During this operation, it is good to keep the camera lens mount down to moving particles leaked out, rather than falling back on the sensor.Step 3When our matrix are greasy spots , it will be necessary wet cleaning . For this purpose, we use the appropriate spatula ( sticks of material niegubiącym fibers ) and a special fluid or methanol with a high concentration (not less than 98-99 %). Liquid applied on a spatula (do not pour it directly on the sensor ! ) , Which was then in a very gentle way rub the surface of the filter. The whole time we work with a sense that you do not scratch the filter. Do not press down with a spatula to die - prowadźmy it so that it was based on only its own weight.Step 4After cleaning, turn off the camera ( after pulling tools from inside cyfraka ! ) , We assume the lens , and then perform a test shot . If the photograph we see any more dirt , then repeat the entire procedure , if not, we can again enjoy the " pure " photography.A few important details :1 Always , first remove the dirt and dry , and only then wet - not vice versa !2 When vacuuming the inside of the body with pear, it is better to suck than blow it - so we admit dust , and it will not be blown ( move ) throughout the chamber and avoid accidental " zaplucia " sensor ( the pear may be condensation )3 We must not touch any tools to die off brush and spatula !4 If the sensor vacuuming with a vacuum cleaner , then set it on the weakest suction.5 We should not use regular brushes , and only the soft hair of electricity that attracts dust and do not lose their hair .6 During the sensor cleaning wet , use a special spatula made of material that does not lose fibers. Do not however use the popular cotton buds as they leave the sensor Italian and sharp tip can scratch the anti-aliasing filter .7 Degreasing liquids are used only for cleaning the matrix , or alcohols - isopropyl (isopropanol ) or methyl (methanol ) - a high concentration ( 98-99 %). The weaker (as well as old , weathered liquids) may leave a white residue.8 The fluid is dispensed on a spatula , rather than directly on the sensor !9 Do not use the sensor cleaning solutions intended for this purpose (eg, low-cost fluids lens ) , as they may damage the surface of the filter antyaliasingowego .10th Throughout the duration of the operation of our sensor cleaning cyfraka kontrolujmy battery level - turn off the camera when in the middle is a spatula or pear , may result in damage to the shutter curtain or mirror.11th Use a brush or spatula, very gently touch the sensor - too much pressure can cause scratches or even breakage antyaliasingowego filter .12th Tools for cleaning the sensor, let us buy only from trusted vendors.13th Before we proceed to clean the sensor , let's do our test devices such as the Pocket mirror - we'll find out in such a way that: pear is not " spit ", do not lose hair brush or fluid does not leave behind white streaks .Prevention is better than cureIn conclusion, the sensor cleaning is not a complicated task , but it requires careful consideration. Therefore, do not underestimate this step - a moment of inattention can cause scratches antyaliasingowego filter , which costs considerable money . But it is enough to work with sensitivity and attention to safely remove dust sensor and enjoy the " clean " images. The best way to clean the die is still ... not allowing its soil . It's obvious - even seemingly trivial - finding , however, is the best recipe for avoiding the problems posed by the contamination of the sensor. That is why our fight against dirt and oil stains on the matrix we start from a fixed camera to maintain clean and be cautious when changing lenses - it is mainly through the lens mounting hole dirt gets into the body .
If you want as long as you keep the template in a clean , during the exchange of optics should follow these guidelines. First of all, before unplugging wipe the camera lens from dust , sand, etc. In addition, when translating the glass should hold the body so that the bayonet was directed to land in the rain or wind should also protect cyfraka eg jacket . It is also prepared by first lens that we assume ( pull it out of the bag and remove the rear lens ) , and only then remove the glass from the body - so that up to shorten the time for which the camera remains open . Some zooms reach their full integrity only when nakręcimy to not filter . Therefore, during the shooting should be founded on a lens cap (for example, UV or polarizer ) , because through it will reduce the amount of " wpompowywanego " dust through the lens into the body .
Of course, no matter how much we care about the hardware, sooner or later our SLR matrix may appear uninvited guests . Although the spots in the pictures we can remove in a graphics program , but better to avoid tedious retouching and clean the sensor in cyfraku . Some DSLR manufacturers advise against self- dusting matrix , recommending putting the camera to an authorized service center . But personally I think that it is a difficult task and , with due caution , you can do it yourself, thus saving time and money - especially since it is a procedure that must be repeated from time to time.
Contrary to popular belief , the sensor cleaning is too complicated task , so there is no reason to fear it , but certainly you have to be careful. If you only have access to the camera , this operation is relatively simple . Therefore SLR owners are in a better position because , without unscrewing cyfraka have direct access to the matrix - it is enough to remove the lens and turn the key. So they can no contraindications to clean it yourself - for such a service in the service have to pay dearly . The worse situation , unfortunately, compact users who have to do so they would have spread to the camera . Therefore fotoamatorom uses cyfraków with non-replaceable optics discourage self- dusting matrix , as this may void your warranty and damage to the compact . The method described below is addressed solely to the owners of digital SLR cameras .Before we begin ...The first thing we need to do before you start cleaning the sensor to charge the battery. During the cleaning process must be because cyfrak on ( Sensor Cleaning mode ) and it continuously raised mirror and open the shutter curtain . If you vacuum sensor we unloaded the battery , it uszkodzilibyśmy mirror or snapshot . Therefore, let us work only with fully charged batteries ! Not recommended for use as a power source is connected to the AC outlet , as the decrease or loss of power would result in the same effect as the discharge of the battery - unless you 're protected uninterruptible power supply (UPS).
Before removing the lens should also wipe the device with a cloth (preferably soaked in anti-static ) . This allows the interior cyfraka us not fall further dust present on the body , and the body will not be electrified and attracted " fresh " dust. After optics - before you enable the option Sensor Cleaning - should also vacuum the inside of the camera.
Then it is good to see where the matrix is dirt . To this end, we should take a picture before the bright and uniformly illuminated flat surface with the camera set to the smallest aperture , which is the largest of its value , such as f/22, f/32 . A good subject for this photo is a white wall or the sky - in the latter case, attention is drawn to the frame did not show up any bird that could be later interpreted as a speck . Such approach taken notice any dirt sensor . Particles of dust, sand and Italian come to photography as a fine dark spot with sharp edges , and greasy dirt - as translucent spots with gentle range. Just remember that the captured image is reversed with respect to that which occurs in the matrix - for example, point to the upper left of the frame is located in the lower right corner of the sensor.

Before we start cleaning the sensor, it is worth doing a test shot to get an idea of where the contamination. The photograph is performed on the highest available aperture and a theme images can be selected such as the sky .After the initial set up your unscrew the lens and turn the Sensor Cleaning function - now we have full access to the camera and the matrix, or rather it is located above the filter antyaliasingowego (his will in fact be cleaned ) . Although the lithium- niobium surface of the filter is fairly scratch resistant , it does not mean that it can not be damaged - and therefore the steps vacuum sensor must be done very gently and carefully !Dry or wet ?There are two methods for sensor cleaning : dry and wet. Using the first remove any volatiles from the sensor particles ( pollen, dust , sand , etc.) , and the second is used to dispose of oily stains. Notwithstanding this , the dirt removed , it is first necessary to collect the (dry) from the surface of the matrix particles of dust with a vacuum cleaner or a brush electrostatic pears to sharp particles , such as sand , not porysowały us sensor . The operation is performed by holding the camera lens mount down , bearing in mind that the vacuum inside the walls of the body - otherwise , found dust on them in a short time re- contaminate the matrix .
If the sensor have oily spots , then the next step we have to wash the "heart cyfraka " (so-called wet method ) using special swabs and fluid . Before cleaning , always performed first dry-cleaning ! Using for the first time with some liquid should test it before you use ( check that does not leave behind white streaks ) , performing a trial cleaning surfaces such as pocket mirrors . Only after this test we can proceed to remove stains from the matrix. Just remember that the liquid applied on a spatula ( not directly on the sensor ! ), Which is in a very delicate way to wipe the surface of the filter. After the cleaning is finished, turn off the camera , we run the lens i .. ready . Now you can re- take the photo and see if we removed all the dirt .
On the following pages you will find a list of accessories necessary to perform surgery to remove the contaminants from the matrix , and a summary of the tasks in four steps with helpful tips .
Corporate sensor cleaning accessories
Finished products from the list below can be purchased at specialty retail, or through online stores and auction sites.
Pear - works well to remove dust and dry. Is it worth it to buy at the pharmacy, because at photo shops is usually several times more expensive. When working with a blower be careful not to touch her die - rubber tracks are hard to remove. It is also better to suck dust than blow air inside pears because sometimes there is condensation, which while blowing can "spit" water droplets sensor.
Brush electricity - the best tool for vacuuming. It has soft bristles, so it will not scratch the sensor. Attracts dust and not lose hair, which is often the case when we use ordinary brush.
The vacuum sensor dry most of the electrostatic brush, for example, such as that of brushoff.
Special cleaning fluid matrix - often sold complete with spatulas, helps to remove grease and leaves a trace. Low-cost optics cleaning fluid should not be used for "cleaning" sensor, as they often leave white streaks on the matrix - like stale or low-level spirits. Do not pour liquid directly onto the sensor (it only wettable spatula)!
Before buying a fluid first let's check the expiration date, as expired or evaporated can leave white streaks on the sensor.
Spatulas - special sticks made of wood or plastic and fiber material niegubiącego. They are used solely in conjunction with the liquid to wet cleaning. Ordinary Ear swabs should not be used as they leave the matrix Italian and sharp tip swab could scratch the anti-aliasing filter.
The way home
Ready for sensor cleaning accessories are relatively expensive and sometimes impossible to find. Therefore, if we can not afford a complete set, you can do it yourself.
Vacuum cleaner - instead of pears or electrostatic brush to remove dust and sand from entering the camera can use household vacuum cleaner. However, to fulfill on their role, we have to adapt it accordingly. We will need to shrink tube (available at automotive stores) and the plug (eg rubber used to baniaków the wine) with the appropriate diameter to permit a vacuum cleaner hose end blindness. Then drilled a hole in the cap and plug in the heat-shrinkable tubing - well, if it has at least 40-50 inches long. Now we can collect any dust not only from the matrix, but also from the mirror and focusing screen. NOTE: Do not touch any parts inside the tube camera!
Alcohol - instead of expensive cleaning fluid to the matrix can be used much cheaper - and sometimes even more effective - pure isopropyl alcohol (isopropanol) or methyl (methanol) with a high concentration (98-99%). He does very well with all the oil stains. Put some it is always the spatula. NOTE: Do not use old, weathered and low-level alcohol because they will leave white streaks on the sensor!
Sensor cleaning step by stepBefore we proceed to vacuum matrix , we should first clear the body of dust that do not run on the vacuum sensor inside the camera. We also need to recharge the batteries , because cyfraka off during the cleaning process can damage the shutter and mirror. It is also done - with a stop set to the highest value (eg, f/22, f/32 ) - a test shot uniform surface (eg a white sheet of paper or the sky ) , which will locate the dirt on the sensor . We should remember that the image displayed on the LCD display is reversed - it's what the matrix is in the upper left corner of the screen will appear in the lower right corner . Now we can get down to work ...Step 1Unscrew the lens from the body and using pears or properly equipped, remove the vacuum cleaner ( not touching any part of cyfraka ! ) Particles of dust or sand inside the camera . Then turn on the option menu of our cyfraka Sensor Cleaning - now have full access to the heart of SLR . Throughout the duration of the sensor cleaning function will be maintained raised mirror , which is why it is important for you to keep control of the battery charge .Step 2Use the brush to gently remove the electrostatic dry matrix particles such as dust , sand , etc. For this purpose, we can use a vacuum cleaner or a pear ( it is better to suck than blow it ) - do not touch them, but the surface of the filter , because it could scratch . During this operation, it is good to keep the camera lens mount down to moving particles leaked out, rather than falling back on the sensor.Step 3When our matrix are greasy spots , it will be necessary wet cleaning . For this purpose, we use the appropriate spatula ( sticks of material niegubiącym fibers ) and a special fluid or methanol with a high concentration (not less than 98-99 %). Liquid applied on a spatula (do not pour it directly on the sensor ! ) , Which was then in a very gentle way rub the surface of the filter. The whole time we work with a sense that you do not scratch the filter. Do not press down with a spatula to die - prowadźmy it so that it was based on only its own weight.Step 4After cleaning, turn off the camera ( after pulling tools from inside cyfraka ! ) , We assume the lens , and then perform a test shot . If the photograph we see any more dirt , then repeat the entire procedure , if not, we can again enjoy the " pure " photography.A few important details :1 Always , first remove the dirt and dry , and only then wet - not vice versa !2 When vacuuming the inside of the body with pear, it is better to suck than blow it - so we admit dust , and it will not be blown ( move ) throughout the chamber and avoid accidental " zaplucia " sensor ( the pear may be condensation )3 We must not touch any tools to die off brush and spatula !4 If the sensor vacuuming with a vacuum cleaner , then set it on the weakest suction.5 We should not use regular brushes , and only the soft hair of electricity that attracts dust and do not lose their hair .6 During the sensor cleaning wet , use a special spatula made of material that does not lose fibers. Do not however use the popular cotton buds as they leave the sensor Italian and sharp tip can scratch the anti-aliasing filter .7 Degreasing liquids are used only for cleaning the matrix , or alcohols - isopropyl (isopropanol ) or methyl (methanol ) - a high concentration ( 98-99 %). The weaker (as well as old , weathered liquids) may leave a white residue.8 The fluid is dispensed on a spatula , rather than directly on the sensor !9 Do not use the sensor cleaning solutions intended for this purpose (eg, low-cost fluids lens ) , as they may damage the surface of the filter antyaliasingowego .10th Throughout the duration of the operation of our sensor cleaning cyfraka kontrolujmy battery level - turn off the camera when in the middle is a spatula or pear , may result in damage to the shutter curtain or mirror.11th Use a brush or spatula, very gently touch the sensor - too much pressure can cause scratches or even breakage antyaliasingowego filter .12th Tools for cleaning the sensor, let us buy only from trusted vendors.13th Before we proceed to clean the sensor , let's do our test devices such as the Pocket mirror - we'll find out in such a way that: pear is not " spit ", do not lose hair brush or fluid does not leave behind white streaks .Prevention is better than cureIn conclusion, the sensor cleaning is not a complicated task , but it requires careful consideration. Therefore, do not underestimate this step - a moment of inattention can cause scratches antyaliasingowego filter , which costs considerable money . But it is enough to work with sensitivity and attention to safely remove dust sensor and enjoy the " clean " images. The best way to clean the die is still ... not allowing its soil . It's obvious - even seemingly trivial - finding , however, is the best recipe for avoiding the problems posed by the contamination of the sensor. That is why our fight against dirt and oil stains on the matrix we start from a fixed camera to maintain clean and be cautious when changing lenses - it is mainly through the lens mounting hole dirt gets into the body .
If you want as long as you keep the template in a clean , during the exchange of optics should follow these guidelines. First of all, before unplugging wipe the camera lens from dust , sand, etc. In addition, when translating the glass should hold the body so that the bayonet was directed to land in the rain or wind should also protect cyfraka eg jacket . It is also prepared by first lens that we assume ( pull it out of the bag and remove the rear lens ) , and only then remove the glass from the body - so that up to shorten the time for which the camera remains open . Some zooms reach their full integrity only when nakręcimy to not filter . Therefore, during the shooting should be founded on a lens cap (for example, UV or polarizer ) , because through it will reduce the amount of " wpompowywanego " dust through the lens into the body .
Of course, no matter how much we care about the hardware, sooner or later our SLR matrix may appear uninvited guests . Although the spots in the pictures we can remove in a graphics program , but better to avoid tedious retouching and clean the sensor in cyfraku . Some DSLR manufacturers advise against self- dusting matrix , recommending putting the camera to an authorized service center . But personally I think that it is a difficult task and , with due caution , you can do it yourself, thus saving time and money - especially since it is a procedure that must be repeated from time to time.
Friday 27 September 2013
Photoshop - remove red eye
Mode of the camera flash on the human eye makes the often unwanted effect is obtained so. Red Eye. Fortunately, with the help of Photoshop comes here.
 First we select our model pupil. To do this, select the tool Lasso Tool (L key).

We need to outline exactly pupils. To make us more comfortable, we upgraded our first image using the sliders, also visible in the illustration above. At high magnifications on the thumbnail appears in a red rectangle mapping viewable. Move it to either of the pupils, so that you can see the whole.

In the main area, outline exactly where the pupil. After this operation, press the space bar and hold it. The cursor will change to white "paw" and now we can click on the picture and move it so that it came out the other pupil. Release the spacebar and Shift-select the second pupil (press and hold this button to add a new area to the previous selection, as a whole).
In this way we obtained indicated both eyes. Use the slider to zoom back to 100 percent. (or enter the value manually from the keyboard in the box next to the slider). Be careful not to click now somewhere in the picture, as this will cancel our previous selection. If all went well, and we see the whole picture with marked eyes - choose from the main menu: Layer -> New Adjustment Layer -> Hue / Saturation.
In the first dialog box, click OK once:

In our case, we want to change the eye color to blue. Select the first option Colorize, and sliders to set the following items:

A specific color depends of course on what we want to achieve - it may be because any other. At the moment, the eyes do not look more natural (as seen on the right side of the window in the picture above), but in a moment it will change.
Go to the window layer is responsible for our image file.
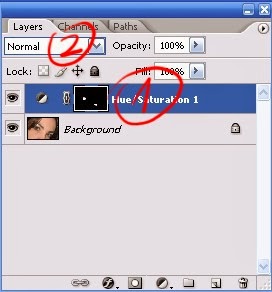
First, make sure if you are in at the moment layer Hue / Saturation, like in the picture above. If not - click once on its name (one in the picture). Then click slightly above drop-down list of the selected standard Normal (marked on the picture as 2).
Then open up quite a long list of options covering layers (applied to the located below). Select the position of Hue. If the effect has proved to be a bit too strong, we can weaken it by selecting a value of less than 100 percent. Opacity field. It's all eyes gained a new color model.
The end result:

Retouch photos, remove red eye
In practice, the removal of this effect is the same as changing the color of the pupils in any other. We take care of just the latter case, which also certainly many of you deem useful.
We need to outline exactly pupils. To make us more comfortable, we upgraded our first image using the sliders, also visible in the illustration above. At high magnifications on the thumbnail appears in a red rectangle mapping viewable. Move it to either of the pupils, so that you can see the whole.
In the main area, outline exactly where the pupil. After this operation, press the space bar and hold it. The cursor will change to white "paw" and now we can click on the picture and move it so that it came out the other pupil. Release the spacebar and Shift-select the second pupil (press and hold this button to add a new area to the previous selection, as a whole).
In this way we obtained indicated both eyes. Use the slider to zoom back to 100 percent. (or enter the value manually from the keyboard in the box next to the slider). Be careful not to click now somewhere in the picture, as this will cancel our previous selection. If all went well, and we see the whole picture with marked eyes - choose from the main menu: Layer -> New Adjustment Layer -> Hue / Saturation.
In the first dialog box, click OK once:

In our case, we want to change the eye color to blue. Select the first option Colorize, and sliders to set the following items:

A specific color depends of course on what we want to achieve - it may be because any other. At the moment, the eyes do not look more natural (as seen on the right side of the window in the picture above), but in a moment it will change.
Go to the window layer is responsible for our image file.
First, make sure if you are in at the moment layer Hue / Saturation, like in the picture above. If not - click once on its name (one in the picture). Then click slightly above drop-down list of the selected standard Normal (marked on the picture as 2).
Then open up quite a long list of options covering layers (applied to the located below). Select the position of Hue. If the effect has proved to be a bit too strong, we can weaken it by selecting a value of less than 100 percent. Opacity field. It's all eyes gained a new color model.
The end result:

10 simple tips to take good pictures with a compact camera
The main advantage of compact cameras, is their size. Easily fit in your pocket, so you can always be at hand. They are not expensive, so almost everyone can afford them. The software also allows you to take a decent picture even to those who are not your shooting polished. Today we will tell you what to do to pictures of compacts were even better.
1. You can shoot almost anything. From landscapes, sunset on the silhouette and the faces of people close to us. No matter what theme you choose, be sure to pay attention to the light.
You're going to shoot landscapes? The best light is afternoon. If you come to a lovely spot in the South, then you may want to go back at a different time of day?

2. When taking photos of people, make sure that they were in a natural posture. Setting someone "at attention in the background", the souvenir of the holiday comes uninteresting. Make sure also that the person shooting the light does not shine directly in the face. The model will have the przymrożone eyes. And be creative - even collective image does not have to be boring and casual about it.

3. Avoid big contrasts. This applies, for example, pictures on the beach. Acute sun causes the model has a very distinct shadows on the face, heavily underlined by wrinkles and a man coming years. For this effect girl is ready to throw us later. If so we will have to shoot in bright sunlight, it's use flash. It lightens dark circles and proves that it is not true that is only for taking pictures in dark areas.

Accessories photographer - Flash Units
http://www.mudah.my/NEW+Yongnuo+YN565EX+Flash+Light+For+Canon+Nikon-22969731.htm
4. Each Compact is an icon called "scene modes". It should be more familiar with them and make friends. Sparing us because in thinking. They are so written to automatically select the optimum parameters for the specific terms and conditions. It is worth to use them especially on the beach, when taking close-up pictures (macro), on the move, at night, etc.

See when to use scene modes on the camera
http://yourcontentnotes.com/2011/02/shooting-modes-canon-camera/
5. Taking pictures at night is also a skill. In addition to setting the appropriate mode, yet could use a tripod. This is not necessarily a heavy tripod professional - just a small pocket that can be purchased at any camera store in a few dollars. If you do not have it, look for places where we can firmly rely on the camera. This can be a bench, fence, trash, and even lantern. By doing night shots, you should also use the self-timer - then avoid movements that can cause pressing the shutter button.

6. Issues and out of focus at all bane little advanced photographers. Just a slight tremor caused eg by entering the observation tower or approach uphill to when shooting moved the camera and as a result recorded image will go to the trash. Photographic equipment manufacturers seeking to reduce the unpleasant effect of using the so-called. stabilizers that reduce vibrations. There are various ways to stabilize, so it is worth mentioning the Nikon Coolpix S70 model with hybrid dual vibration reduction: the lens and electronically.

 Smile detection in Sony compacts

10. th Do not be shy imaging. The ideal would be to prepare images in Photo Shop by a professional graphic artist. But it is expensive and can be avoided. On the web you will find a lot of free programs with basic tools (eg popular Picasa). Going even with less power - often the primary treatment can be done even in the camera. Ba - such tools are offered even on some mobile phones like Sony Ericsson or those with Android.
 Find out how to improve your photos in Picasa free
In general, do not be afraid to take pictures and let us do them a lot. Even if a large part of them and then throw out, these things will be shown to others. We should also remember that our work will be well evaluated by others when it is well presented. After returning from holiday must be applied to make a selection of photos, and when you want the show to invite their friends -'s limit the number of photographs up to a hundred. There is nothing worse than being forced to watch hundreds of flimsy photo.
1. You can shoot almost anything. From landscapes, sunset on the silhouette and the faces of people close to us. No matter what theme you choose, be sure to pay attention to the light.
You're going to shoot landscapes? The best light is afternoon. If you come to a lovely spot in the South, then you may want to go back at a different time of day?

2. When taking photos of people, make sure that they were in a natural posture. Setting someone "at attention in the background", the souvenir of the holiday comes uninteresting. Make sure also that the person shooting the light does not shine directly in the face. The model will have the przymrożone eyes. And be creative - even collective image does not have to be boring and casual about it.

3. Avoid big contrasts. This applies, for example, pictures on the beach. Acute sun causes the model has a very distinct shadows on the face, heavily underlined by wrinkles and a man coming years. For this effect girl is ready to throw us later. If so we will have to shoot in bright sunlight, it's use flash. It lightens dark circles and proves that it is not true that is only for taking pictures in dark areas.

Accessories photographer - Flash Units
http://www.mudah.my/NEW+Yongnuo+YN565EX+Flash+Light+For+Canon+Nikon-22969731.htm
4. Each Compact is an icon called "scene modes". It should be more familiar with them and make friends. Sparing us because in thinking. They are so written to automatically select the optimum parameters for the specific terms and conditions. It is worth to use them especially on the beach, when taking close-up pictures (macro), on the move, at night, etc.
See when to use scene modes on the camera
http://yourcontentnotes.com/2011/02/shooting-modes-canon-camera/
5. Taking pictures at night is also a skill. In addition to setting the appropriate mode, yet could use a tripod. This is not necessarily a heavy tripod professional - just a small pocket that can be purchased at any camera store in a few dollars. If you do not have it, look for places where we can firmly rely on the camera. This can be a bench, fence, trash, and even lantern. By doing night shots, you should also use the self-timer - then avoid movements that can cause pressing the shutter button.

6. Issues and out of focus at all bane little advanced photographers. Just a slight tremor caused eg by entering the observation tower or approach uphill to when shooting moved the camera and as a result recorded image will go to the trash. Photographic equipment manufacturers seeking to reduce the unpleasant effect of using the so-called. stabilizers that reduce vibrations. There are various ways to stabilize, so it is worth mentioning the Nikon Coolpix S70 model with hybrid dual vibration reduction: the lens and electronically.

Beware of raised and out of focus. Remember to include stabilization in the camera.
7. The compact camera is not possible to manual focus, so we have to rely on autofocus. The low-cost cameras, autofocus, however, must take a while. Therefore, it is necessary to get into the habit - at first gently press the shutter button, giving you time autofocusowi to perform their work. When the display you'll see that the focus is already set, you can press the shutter button fully.
8. In many latest models of compact cameras manufacturers place many additional features to make shooting. These include, for example, smile detection, narrowed eyes or motion tracking. How do they work? The first of these is manifested by the fact that the camera will signal us when it detects a smile on your face model. The second, or signals, or even make it impossible to register the image when it comes to the conclusion that the model squints. Useful for shooting during sports activity is the tracking feature - the focus will move along with the tracked object (eg, cyclist or skier) ..
8. In many latest models of compact cameras manufacturers place many additional features to make shooting. These include, for example, smile detection, narrowed eyes or motion tracking. How do they work? The first of these is manifested by the fact that the camera will signal us when it detects a smile on your face model. The second, or signals, or even make it impossible to register the image when it comes to the conclusion that the model squints. Useful for shooting during sports activity is the tracking feature - the focus will move along with the tracked object (eg, cyclist or skier) ..

9. Over cadre worth a moment to think not only when using an expensive SLR camera. Rules composing the image are known for hundreds of years and by the way compact cameras get additional help in the form of guidelines. The guidelines do not only allow you to frame parallel to the landscape (there is no effect sloping sea), but allow the deployment of the frame according to the rule of thirds.


In general, do not be afraid to take pictures and let us do them a lot. Even if a large part of them and then throw out, these things will be shown to others. We should also remember that our work will be well evaluated by others when it is well presented. After returning from holiday must be applied to make a selection of photos, and when you want the show to invite their friends -'s limit the number of photographs up to a hundred. There is nothing worse than being forced to watch hundreds of flimsy photo.
Subscribe to:
Posts (Atom)