expr:class='"loading" + data:blog.mobileClass'>

Wednesday 30 October 2013

Sensor cleaning with Discofilm

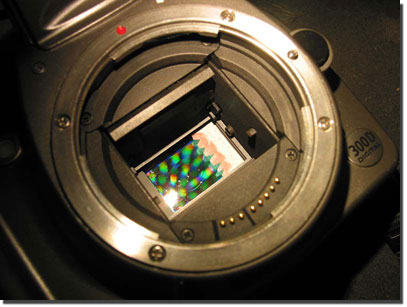
Occasionally it is necessary to clean the sensor of a DSLR. By its open design, dust can enter the mirror box and settle on the sensor during exposure. The camera has a function "sensor cleaning". When it’s activated, the mirror turns away; the shutter opens and frees the sensor. What you see now is actually not the sensor, but the infrared blocking filter which is a few millimetres in front of it. So you will clean a piece of coated glass and not the real semiconductor. The filter consists of several layers, is very expensive and can not be changed easily. Now we know, what’s good for cleaning filters is also good for cleaning "sensors".

On the internet a huge number of different possibilities to clean sensors can be found. It starts with cotton applicators soaked with methanol and ends with special cleaning brushes. With Discofilm I want to do it in another way. The original area of application for Discofilm is cleaning of records. The transparent, water soluble liquid with viscosity of honey is painted on the surface; it dries within one hour and forms a thin foil. In this foil all dust particles are enclosed and will be removed by peeling off the foil without leaving any residue. The result is an absolutely clean surface. However we have to overcome a few difficulties to be able to clean a sensor with Discofilm reliably. The main problem is to find a point in the deep mirror chamber on which the dried foil can be taken off. Let’s do it step by step:
The Discofilm is painted on the blocking filter with a small brush. This is unproblematic, since the brush doesn’t get in contact with the glass. There’s always the viscous Discofilm between the hairs and the surface. Be aware that no liquid can enter the small gap between the glass and the covering framework. The risk is small but it could complicate taking off the foil afterwards. I recommend a small gap to the sensor border.


dry Discofilm


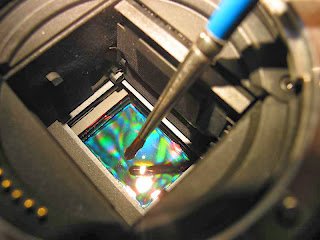
A slash has to be integrated otherwise you can’t peel off the dry foil. Just put a small piece of paper on one of the edges. The paper has to be absorbent and tear proof. It absorbs the wet film and during the drying process both build a fixed connection. Ensure that the camera is orientated horizontally during drying. Now you have two choices. You can leave the sensor cleaning function activated and the film dries with open shutter. Depending upon temperature, air humidity and thickness of film it will take one to three hours (rather wait longer, than to be to impatient). A fresh charged camera battery has no problem to hold the shutter open for four hours or even more. Especially for beginners in Discofilm cleaning this is the recommended procedure. When you are on journey and have to save battery power, you can deactivate the sensor cleaning. The shutter gets closed and the mirror places in front of it. The paper has to lie flat on the sensor; otherwise the shutter could be damaged. Of course this will extend drying time. Independent of your choice, do not attach a lens to your camera, since this would slow drying dramatically. Covering the opening with a sheet of paper is completely sufficient to prevent dust from entering the mirror box. Do not try to accelerate the drying with a hair-dryer, leave it at room temperature. After drying it’s the best moment you can imagine for blowing out your camera. The sensor is safe under Discofilm, the mirror protects the focusing screen and the shutter is turned away. Just be aware of the auto focus optics in the base plate. Now it’s time for peeling off the film. Grab the paper slash with a pair of tweezers and pull, that’s it. Discofilm will not leave any residues.
Before cleaning your camera you should get familiar with the proceeding. Take a photo filter for testing and be amazed how good it works.
Here are two pictures of the sensor under the microscope, left is before and right is after cleaning. The dust particles which can be seen in the first picture are such small they were barely visibly in pictures, but I want to demonstrate how efficient Discofilm cleans.

24 x 36mm sensor DSLR


 The method described above works well with crop cameras. The small sensor and paper slash have plenty space in the mirror box. For other cameras like the Canon 5D I have made the procedure more general.
It’s now a two step process. The whole sensor surface is painted with Discofilm. Now let it dry. The second step is integrating the paper slash. Put a small drop of Discofilm in one of the edges (I prefer the side of the mirror). It will solve the dried film. Now put the paper slash on it and they will build a solid connection after drying. Of course this general method works on crop cameras too.

Comparison with other cleaning methods

Advantages

  • Discofilm does not leave residues after drying.
  • No risk to scratch your sensor.
  • With this method the dust is really removed from your sensor and not shifted to another edge.
  • Discofilm does not forget dust grains. Each area witch had contact with the film will be dust free.


Disadvantages

  • It takes long, until the film is dried.
  • Discofilm can only solve water-soluble materials. Fingerprints for example will not be removed completely.


Problems  
    

            If Discofilm is applied to economically and the film gets to thin, it can brake during peeling off and part of it stays on the sensor. Don’t get nervous and start applying Discofilm again.

Sometimes the paper slash tears. This is a sign that the paper you’ve chosen is not tear proof enough. Attach a new paper slash.
If you dry the film with closed shutter, do not move the camera uncontrolled until you are sure the film is dry. Otherwise the shutter could get glued.

Discofilm? Where can I get it?

This can be a real problem. Discofilm is not sold in many countries. This was one of the reasons, why I have developed a version which is optimized for DSLR sensor filters. The shop and plenty of information can be found here: www.sensor-film.com


Tuesday 29 October 2013

How to get a great effect flash

The lamp on the right side tilted about 25 degrees, without modulation, plain lampshade light parasolkowy straight model.

Regardless of whether you work in the built-in flash camera, external speedlite'em or head light studio , remember that if you stand close to the background , very difficult to get rid of the shadows. Only a softened light will cause them to become weak ( refer to the article on the studio light modulators ) . I think it's not a problem. You can still be regarded as assets shadows pictures .External study lampHowever, if you want to get rid of the shadows , you have to use a very soft starters ( eg large octagonal softbox ) . You can also bounce light from the opposite wall or run away from the background. In the outdoors can be set in such a way that the shadow is not at all visible in the photograph .Working with a study lamp , remember that when you light the face of it , you have to control the shadows resulting from the construction of the body model or a model. When the flash is set to the side, you can easily make yourself the hassle odkładającym a shadow nose. Not always looks good. Especially if your model has a more proven nose . Similarly , things are out of eye sockets . If the eyes are deep- set , need to be careful of too high a setting flash.
The lamp on the right side of 25 degrees from the top, a small softbox 60 x 80 cm.

Reflection of light from the wall , ceiling or other surface will be much softer , but remember that when the wall is a color (especially when it is painted matt paint ) , the reflected light will be the color of the wall color. Feel free to bounce the flash of gleaming surfaces , including the windows, but then do not get so soft light as the opaque material .TTL flash - SpeedliteSomeone once told me at a workshop that working with a Speedlite external flash is not professional , because it gives a fairly flat light. Indeed, the system operating in the external flash TTL system does not give too beautiful lights when you are working in automatic mode. Also, remember that the size of the burner is much smaller than the studio lights ( the smaller the light source , the harder light). There is therefore no point in using the flash in a departure from the model. A few meters away is the maximum - if you go on, the light Speedlite will be too hard, if at all it reaches the model .
Pictures taken with the flash Canon Speedlite 580EX II.

Outdoor lights make it possible to adjust the flash output. When you come close to the model, often it is necessary to subtract the flash, the portrait does not become too "flat".

He very often I use speedlite'a outdoor session. I do not believe, however, Canon's E-TTL system II, turn the manual mode and adjusts the flash output for the conditions. Nikon has a much better developed system of a flashlight, but it does not always copes with what you want to achieve. Much faster and easier to switch equipment to the manual mode, which allows for greater control.

Last year's Pirelli Calendar photographed by Terry Richardson's work is created using a Speedlite flash.


The external lamps are adjustable head , thus being in the interior, the light can be reflected from the walls , as in the case of studio lighting . On the other hand, in the open air , taking the blend , you can bounce the light was from her. Unfortunately, sometimes shortages and a need for someone who can help .On the market there are also all kinds of diffusers, which are designed to soften the light speedlite'ów . I do not like them - I prefer the pure light coming directly from the burner lights , but this is a matter of personal preference. Each light differently , each in a different way modulates the light. I encourage the test , try and then buy . Similar modulators can also perform household methods . YouTube is full of different solutions .Regardless of how you will work with the flash , make sure the hardware will not do for your images . The more you control your work , the greater your impact on the finished effect in the form of photographs. One lamp mastered much faster than whole studio . Just from this one lamp must begin only when it will not be a mystery to you , reach for more light ...

Monday 14 October 2013

Night shots ... how to take a picture at night?

Often we want to capture , catch , capture the memory of "something " during the night. That's bad luck made ​​that night, get to different places almost as much as during the day . Suppose , for example , accidentally get in a beautiful place. Grab for the camera , press the shutter , a glance at the display window i .. consternation . It did not work . Why ? That is the question . I will try to answer with a perverse method of showing photos, the good and the bad , just do not know which is which ... Hmm , so I will show methods of taking photographs of both the tripod and hand -made . In addition, the issue of night photographs share some topics , which will simplify or complicate you understand " what's going on ." For starters we organize ourselves neat , cheerful , warm night . Why is this ? Well the fact that we do not mind tinkering with the camera. As we already have a nice night , then let's get to the camera. Night Shot of course impossible to do any camera , but the effects will be different . Let's start :1 Ensure you have a charged battery .2 Set the camera on a tripod or camera to take a hand. Connect the drain hose , remote control , or put your finger on the shutter button . Of course it would be nice to have our camera can enable manual settings . If there is no ... not what our options are limited to thematic programs. We then turn the flash off and use the scene to perform - landscape photography , or if you can not turn off the lights - night portraits . It is also important assumption hood and UV filter or polarizer . Get rid of or reduce in this way, different time sought , and usually an unwanted light effects. If possible , you should also enable noise reduction matrix. High sensitivity noise reduction . Increasing the bright parts of the image detail .3 Set the parameters Exposure :- Sensitivity :To operate on a tripod, the sensitivity range of 50 to a maximum of ISO 400To operate the manual sensitivity fluctuates in the range 400 - 3200 ISO , the sensitivities in 1600 and 3200 out grain , but sometimes there is no other way , or we even fit.- Aperture:To operate on a tripod, the average range of 4 to 11For manual operation , aperture set at a level providing us much light as possible , but also providing some depth of field.- Exposure time :To operate on a stand , is dependent on the results you want to achieve .For manual operation , as short as possible , rather Let's face on the machine .- WB:At dusk the white balance set in the sun ( daylight ) and the transition point in the night to change a light bulb ( light bulbs) . You may be tempted to stick to Auto WB . In order to avoid problems with the white balance , you can take photos in RAW format that allows you to replace the white balance on your computer. The disadvantage of shooting in RAW is the need for large amounts of storage space.- Picture Style :Rather, natural , or standard , sometimes landscape .4 Once it's all roughly have set , then we control several shots to refine the parameters of the current settings . It remains for us to join the snapping . With varying degrees of light will affect change settings on the camera . This is what happens when you walk around the city. Force is often necessary to refer to the help AE . And so , if we limit ourselves to set the sensitivity to max, or something like that and having fun zooming . Well now it's time for some examples. The topic I will discuss in groups, or I will concentrate on individual cases.
 Lights , motion, and other surprises

At the outset, we succumb to the charm of lights, flares on the water , neon lights , reflectors, and what's even fireworks. There are questions : How to make so that the lamp turned up at the stars in the pictures ? How to capture fireworks ? How to catch the light on the water? On top of everything as the anger that moves and drills . Exactly what about moving off to . Photographing moving subjects is quite entertaining and even accidental , unless we make the goal of this issue . Luck , appears here as a new independent entity , which will have the opportunity to meet ever been , maybe even go to the "you" . Let us refer , however, to reason , and the two available paths shooting : blurring , smudging , lines of light , ghosts and shadows, is obtained by using a tripod and long exposure time . Impression of movement surrounding the effects arising more from the hand , or from the deck of a moving object is ... Too much and at the same time ? That's right , unfortunately not , so for example :


Well, we have ... Camera : Canon EOS 350D lens : it became the focal Canon EF 50mm f / 1,8 IIleft : tripod , autofocus , time 20 , aperture 11 , ISO 100 , focal length 50mm , white balance, light bulb ,Right side stand , autofocus , one time , aperture 1.8 , ISO 100 , focal length 50mm , white balance, light bulb .Comments on the nature of the universe ... street lamps , street lamps or park , divided into two types. Ones that give a yellow light and when shooting it remains intact, and white, which can be done pretty green . Now to the point. Each photograph is incorrect . The left panel contains a record of time and the picturesque smoke , which is a result of longer exposure time , we get only the photograph . Right behind it has a squadron of UFOs , which is the result of reflections on the lens. Exceptional UV filter did not save the situation , but she saved her increased aperture, but the picture on the left, say " beautiful smoke " . This aperture and longer exposure time , caused the star-shaped lights streaking lights.
Camera: Canon EOS 350D Lens: Tamron SP AF 17-50 mm f/2.8 XR Di II LD
left: tripod, autofocus, time 6, aperture 8.0, ISO 200, focal length 17mm, white balance, light bulb,
right: auto focus, time 1/20, aperture 2.8, ISO 1600, 17mm focal length, white balance, light bulb.
Ghosts and shadows, the effect of longer exposure time. This can be seen in the photo on the left. When shooting with a tripod, remember to content frame. Do not place garbage out there, or strange things you normally would "hand" we have not caught. Remember the first, second and third plan, or for alternatives. An example pictures free "hand" is on the right. It shows that sometimes do not think about the composition of a good thing. Brightly illuminated city it would help us in making quite good photos.

Camera: Canon EOS 350D Lens: Tamron SP AF 17-50 mm f/2.8 XR Di II LD
left: auto focus, time sixth, aperture 2.8, ISO 200, focal length 17mm, white balance, light - sun,
right: auto focus, time 1/8, aperture 2.8, ISO 1600, 17mm focal length, white balance, light bulb.
The movement in the car or on board anything that is fun. A focus on the remote components and minimizing the focus can think of entering the "Warp 7" although no one said "engage". It is on the left. To the right of meeting with "stroke of." For a moment, nothing has swayed, neither we nor they are. Even though no one moved ...

Left: Camera: Canon EOS 40D Lens: Tamron SP AF 17-50 mm f/2.8 XR Di II LD
AF time 1/40, aperture 3.2, ISO 3200, 17mm focal length, white balance, light - sun,
right: Camera - Canon EOS 350D, Lens: Tamron AF 70-300 mm f/4-5.6 Di LD Macro
tripod, autofocus, 0.4 times, aperture 4.0, ISO 1600, 70mm focal length, white balance, light bulb.
People in motion, require a short time, but the results are rather ... movement. The first picture brings them playing in the fountain. At the other two women passing through the street. Reducing blur is obtained by reducing the time, and to refrain from zooming - increasing the focal length.

Camera: Canon EOS 40D Lens: Tamron SP AF 17-50 mm f/2.8 XR Di II LD
left: tripod, autofocus, time 10, aperture 8.0, ISO 100, focal length 17mm, white balance, light bulb,
Right side stand, autofocus, 0.6 times, aperture 2.8, ISO 100, focal length 17mm, white balance, light bulb.
Water. Its surface can help us or help. Use it to the fullest extent. Here I have given two examples illustrate well the basic features. Smooth milk mirror and folijkę. Uniform light color, it helps to enhance the effect. In the case of an abundance of color gets really interesting.

Camera: Canon EOS 40D Lens: Tamron SP AF 17-50 mm f/2.8 XR Di II LD
LEFT page: tripod, hand-held setting sharpness, time of 5, aperture 8.0, ISO 100, the focal length 17mm, white balance bulb,
interior: feature-servo autofocus, the time of 1/40, aperture 2.8, ISO 3200, focal length of the 50mm, white balance bulb,
of law page: tripod, hand-held setting sharpness, time 6, aperture 5.0, ISO 100, the focal length 17mm, white balance bulb.
Short description of the, from the left: coverage of the subject - behavior of the circuit risers (levels same then overlook - not applicable of old buildings because they are curves), then in the middle of close up view detail - made ​​"from the hand of" (you can see the loss of quality), and after the right-hand a little scene a generic requiring from esteemed my person 6 per-second stillness. Proposal is in such a: To photo of was to beautiful happy we all and everything must wait for a few seconds until the up fanlight cage.


 The moon and stars.
Taking the same thought to the subject should look the same . Well, no . But at a time. The sky above us is constantly in motion due to rotation of the Earth on its axis and around the sun . Irradiation of time longer than a few seconds to replace dots of stars in the line. In particular, it is sometimes difficult using our biggest night at - the moon , or rather the moon. The photograph celebrities , photos, landscape , architecture and the like, need a tripod , and the moon solo grab the hand . Of course, if someone has a little more powerful hardware, it can fight hand with the landscape , but you have to reckon with the effects of additional , unwanted or type in spite of the desired grain . Advanced photography stars and other astronomical objects requires the purchase of a telescope on a tripod with an automatic movement equatorial (the first reasonable equipment costs about 3000zł ) . Well, but to the point. Below is a sample of photos taken corner hardware. He photographing the moon with a relatively short exposure time , not very large aperture and low sensitivity . We do , of course, from the hand , but as someone really wants a tripod , then it can . He should then turn off the image stabilization , as it has a camera or lens . Why ? because at high magnification and a lack of detail to capture focus , image stabilization makes wandering the Moon by frame , before setting the focus. Something like walking drunk ... It's very annoying quickly , and it is not completely necessary in the case of a tripod of course. As for the pranks of the Moon ... noo moves bastard and it does not come out the best in your photos. You have to take into account the landscape shooting with a tripod .


 Left and right side: Camera: Canon EOS 40D Lens: Sigma 18-200 mm f/3.5-6.3 DC OS,
AF time 1/320, aperture 8, ISO 400, focal length 200mm, white balance, light - sunshine.
The moon, our inseparable companion. Both examples of this is the same picture. Left resized to 480x320pixeli, right is 1 to 1 with no size adjustment. The proposal is one ... where these telescopes can buy close?

left: Camera: Canon EOS 40D Lens: Tamron SP AF 17-50 mm f/2.8 XR Di II LD
tripod, autofocus, time 10, aperture 2.8, ISO 1600, 17mm focal length, white balance, light bulb,
right: Camera: Canon EOS 350D Lens: Sigma 18-125 mm f/3.8-5.6 DC
tripod, autofocus, time 25, aperture 5.6, ISO 400, focal length 18mm, white balance, light - sunshine.
The left image has a serious defect I did not take into account the risks from the only strong source of light. I thought the sun visor and good UV filter enough. Error. The amendment there was no time. On the right a picture of a defect - poor white balance. In addition, the city is too bright and images of the sky there is nothing to dream about. Landscape, yes, but the sky only as a supplement.


Thursday 3 October 2013

Canon EF 300mm f/2.8L IS II USM and EF 400mm f/2.8L IS II USM


As far as image stabilization we have available three modes:

     MODE 1 - corrects vibrations from every direction, mainly for shooting stationary subjects
     MODE 2 - corrects vertical vibration during movement of the horizontal and vice versa
     MODE 3 - adjusts vibration only during exposure, acts as MODE 2

The second group of switches is closer to the cap. The first one allows you to choose: autofocus, manual focus or measure PF mode, the Power Focus. The second allows you to narrow the focus operation. It is a very useful feature that accelerates the autofocus.


Canon EOS 5D Mark II
f/3.5, 1/1600s, ISO 640, Exposure compensation: 0 EV, 300 mm


Canon EOS 600D
f/3.5, 1/1000s, ISO 400, Exposure compensation: 0 EV, 400 mm


Canon EOS 600D
f/3.5, 1/800s, ISO 400, Exposure compensation: 0 EV, 400 mm

Canon EOS 5D Mark II
f/2.8, 1/100s, ISO 100, Exposure compensation: 0 EV, 400 mm


Canon EOS 5D Mark II
f/5.6, 1/25s, ISO 100, Exposure compensation: 0 EV, 400 mm


 Canon EOS 5D Mark II
f/2.8, 1/100s, ISO 100, Exposure compensation: 0 EV, 300 mm


Canon EOS 5D Mark II
f/5.6, 1/25s, ISO 100, Exposure compensation: 0 EV, 300 mm